


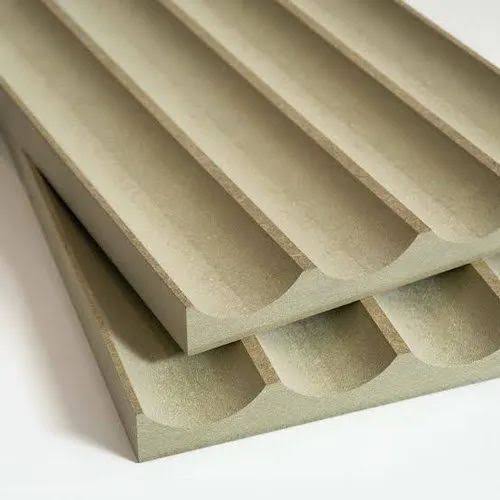
Wooden boards with precisely scalloped edges, created with a CNC router.
Have you ever wanted to give your woodworking projects that extra touch of elegance? Scalloping the edges of a board can add just the right amount of detail to make your work truly stand out. With a CNC router, achieving those perfectly scalloped edges is not only possible but surprisingly easy once you know the steps. Whether you’re a seasoned woodworker or just starting out, learning how to use a CNC metal router for scalloping can elevate your craftsmanship.
In this guide, we’ll take you through the entire process—from understanding what the process means to executing flawless scallops on your board edges. By the end, you’ll have the required knowledge you need to add that unique, polished finish to your projects. Let’s get started!
What is a CNC Router?
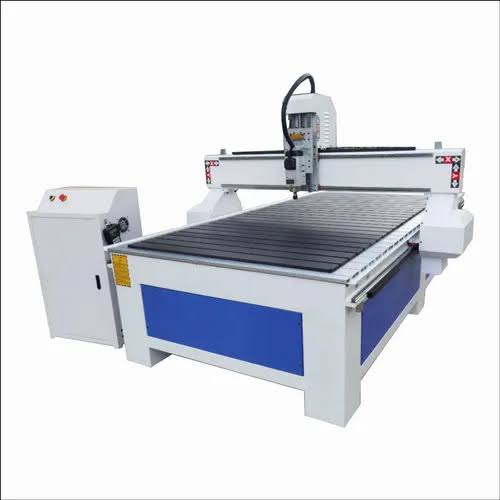
A CNC router is a powerful and versatile machine used in woodworking, metalworking, and various other industries to cut, carve, and shape materials with incredible precision. The “CNC” stands for “Computer Numerical Control,” which means that the machine’s movements are guided by a computer that follows a pre-programmed design. Unlike traditional routers that require manual operation, a CNC router automates the cutting process, allowing for complex and intricate designs to be executed consistently.
These machines are commonly used for creating everything from simple cuts to elaborate carvings, making them indispensable tools for both professionals and hobbyists. A CNC router can work with a wide range of materials, including wood, plastics, foam, and metals, making it incredibly versatile. Whether you’re crafting custom furniture, signage, or intricate decorative pieces, a CNC router allows you to bring your designs to life with precision and efficiency.
What Does Scalloping in Manufacturing Mean?
Scalloping in manufacturing refers to the process of creating a series of rounded, concave cuts or grooves along the edge or surface of a material. These cuts, known as scallops, are typically used for decorative purposes, adding a visually appealing detail that enhances the overall aesthetics of a product. While scalloping is most commonly associated with woodworking, where it’s used to embellish furniture, moldings, and other wooden objects, it’s also applied in metalworking, plastics, and other materials.
In manufacturing, scalloping can serve both functional and decorative roles. For example, in metal parts, scalloped edges can help reduce weight without compromising strength, or they can be part of a design that improves the part’s aerodynamic properties. In woodworking, scalloping is often purely decorative, adding an elegant finish to table edges, picture frames, or cabinetry.
The process of scalloping can be done manually with hand tools, but in modern manufacturing, it’s typically carried out using CNC machines for precision and consistency. CNC routers, in particular, are well-suited for creating scalloped edges because they can be programmed to produce uniform, evenly spaced scallops with a high degree of accuracy.
Why You Can Scallop Board Edges with a CNC Router
Using a CNC router to scallop board edges offers a level of precision and consistency that’s difficult to achieve with manual tools. Here’s why it’s such an effective method:
1. Precision and Consistency
The biggest advantage of a CNC router is its ability to produce precise, repeatable cuts. When you’re scalloping the edge of a board, even the slightest variation can stand out, but with a CNC router, every scallop is cut exactly the same, ensuring a flawless finish. The computer-controlled nature of the machine eliminates human error, so you don’t have to worry about uneven spacing or inconsistent depths. This precision is especially important when working on projects that require a professional-grade finish.
2. Customization and Flexibility
A CNC router offers unparalleled flexibility when it comes to customizing your scallops. You can easily adjust the size, depth, and pattern of the scallops to fit your specific design needs. Whether you’re going for a traditional look with deep, rounded scallops or something more modern and subtle, the CNC router can be programmed to achieve the exact style you want. This customization extends to the types of materials you can work with as well—whether you’re using hardwood, softwood, or even composite materials, a CNC router can handle the task.
3. Efficiency and Reproducibility
Another key reason to use a CNC router for scalloping is its efficiency. Once you’ve set up the machine and programmed the design, the router can produce scalloped edges quickly and accurately. This is particularly beneficial if you’re working on multiple boards or large projects where consistency is crucial. The CNC router’s ability to replicate the same pattern across numerous pieces not only saves time but also ensures that each piece matches perfectly, which is essential for large-scale production or when uniformity is critical.
4. Ease of Use and Safety
While manual scalloping requires a high level of skill and can be physically demanding, using a CNC router simplifies the process. The machine does most of the work, allowing you to focus on the design and finishing touches rather than the physical labor. Additionally, the CNC router’s enclosed cutting environment reduces the risk of injury, making it a safer option for creating intricate designs.
How to Scallop Board Edges with a CNC Router
Scalloping the edges of a board with a CNC router might seem complex at first, but with the right approach, it becomes a straightforward process that yields stunning results. Here’s a step-by-step guide to help you get those beautifully scalloped edges.
Step 1: Prepare Your Design
Before you start, it’s essential to have a clear design in mind. You’ll need to create a digital model of the scallop pattern you want using CAD (Computer-Aided Design) software. This software allows you to customize the size, depth, and spacing of the scallops to fit your specific project. Once you’ve finalized the design, you’ll convert it into a format that the CNC router can understand, typically a G-code file.
Step 2: Select the Right Router Bit
Choosing the appropriate router bit is crucial for achieving clean, well-defined scallops. For scalloping, a ball-nose bit or a V-groove bit is commonly used, depending on the style of scallop you’re aiming for. The ball-nose bit creates a rounded scallop, while the V-groove bit produces sharper, more pronounced edges. Make sure the bit is sharp and suitable for the material you’re working with, as this will affect the quality of the cut.
Step 3: Set Up the CNC Router
Once your design is ready and the bit is selected, it’s time to set up the CNC router. Secure the board firmly to the router’s table using clamps or a vacuum hold-down system to prevent any movement during cutting. Properly securing the board is essential to avoid shifting, which could lead to uneven scallops or damage to the material.
Next, load your design file into the CNC router’s control software. Here, you’ll input the parameters for the cut, including the feed rate (how fast the bit moves across the material) and the spindle speed (how fast the bit spins). These settings will depend on the material and the bit you’re using, so it’s important to adjust them carefully to ensure a smooth cut.
Step 4: Run a Test Cut
Before you proceed with scalloping the actual board, it’s a good idea to run a test cut on a scrap piece of material. This allows you to check the accuracy of your design and make any necessary adjustments to the settings. Pay close attention to the depth and spacing of the scallops, and ensure that the router is cutting cleanly without leaving any rough edges.
Step 5: Scallop the Board Edges
With everything set up and tested, you’re ready to scallop the edges of your board. Start the CNC router and let it follow the programmed path, cutting the scallops into the edge of the board. The machine will work its way around the board, creating consistent, evenly spaced scallops according to your design.
It’s important to monitor the process closely, especially if you’re new to CNC routing. Watch for any signs of the material shifting or the bit struggling with the cut. If you notice any issues, pause the machine and make adjustments as needed.
Step 6: Finishing Touches
Once the scalloping is complete, carefully remove the board from the CNC router. Inspect the scalloped edges for any imperfections or rough spots. If necessary, use fine-grit sandpaper to smooth out the edges and achieve a polished finish. Depending on your project, you might also want to apply a finish, such as varnish or paint, to enhance the appearance of the scallops and protect the wood.
Step 7: Clean and Maintain Your CNC Router
After completing your project, it’s essential to clean your CNC router to maintain its performance. Remove any dust or debris from the machine, and check the router bit for wear. Proper maintenance ensures that your CNC router remains in good working condition for future projects.
Conclusion
Scalloping board edges with a CNC router is a fantastic way to add a unique, polished touch to your woodworking projects. By understanding the process—from preparing your design and selecting the right tools to executing the scallop and finishing the edges—you can achieve professional-grade results with precision and consistency. Whether you’re a seasoned woodworker or just starting out, mastering this technique opens up new possibilities for your craft, allowing you to create pieces that truly stand out. If you don’t have your own CNC router, consider searching for CNC routing near me to find local or online services that can help you achieve these beautiful, scalloped edges with ease.